HOW TO MAKE FINOCCHIONA SALAMI
|
Finocchiona (pronounced ‘fin-ock-ee-oh-na’) is a fennel rich Italian salami heralding from the Tuscany region in central Italy where there is an abundance of wild fennel. Fennel used to be used in abundance as an alternative to pepper which was very expensive at the time. (By “time” we mean an age before motorised transport and electricity! Yes a time when it would take weeks to sail the high seas to a far off land) The story goes that a thief stole a fresh salami from a market and hid it in a market stand of wild fennel. When it was recovered the fennel had absorbed all the aromas and become delicious. And the finocchiona was born…. now I don’t know how much of that is true but it makes for fantastic salami and story.
Tuscan peasants apparently used to use more and more fennel in their salami to mask poor quality wine they had produced and ready for sale – after a slice of finocchionia with some bread all lower quality wines tasted fantastic. (This is apparently down to fennel being rich in menthol which has some anaesthetic properties and would numb the taste buds.) |
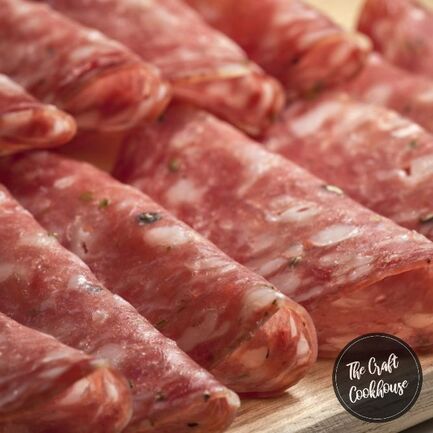
Finocchiona made with larger 50-70m casings
|
You may think fennel and pork don’t work but this really is one of the first that completely disappears on any charcuterie board. This is a firm favourite in our house even with people who don’t like fennel! My wife always asks if we have any “finny-nokky-doo-da” when she has her friends over for a drink – and my wife hates fennel!
If you happen to grow fennel – or have a neighbour that does - then using the fresh seeds and the pollen, as opposed to using dried seeds, will give an even more luxurious salami where the sweet fennel juice bursts from the seed and the pollen deliver another dimension to the salami, but should be used in a reduced % as fresh is stronger than dried.
If you happen to grow fennel – or have a neighbour that does - then using the fresh seeds and the pollen, as opposed to using dried seeds, will give an even more luxurious salami where the sweet fennel juice bursts from the seed and the pollen deliver another dimension to the salami, but should be used in a reduced % as fresh is stronger than dried.
|
INGREDIENTS
700g pork shoulder 300g pork back fat 30g of salt (3% of the total weight of meat and fat) * (sea salt, PDV salt, cooking salt – but not table salt as this has anti-caking agents in and extra potassium) 5g fennel seeds (approximately 2 teaspoons) (or a mix of seeds and fennel pollen is even better) roughly chopped 2 garlic cloves (minced) 2.5g of ground black pepper, you can add some whole peppercorns as well if you like 50ml of red wine (Italian, Tuscan preferred) Hog casings (either 30-34mm or hog middles) [OPTIONAL] – using Bactoferm T-SPX – if you like to use a starter culture to assist with the promotion of the good bacteria and the ph level of the meat during and after fermentation then use 0.125g of T-SPX with 25ml of room temperature distilled or bottled water and add this to the meat mix. Don’t use tap water as the chloramine will kill the starter culture. I prefer to stick to more traditional methods, but the above is useful if you wish to follow a more scientific and uniformed commercial approach to production. |
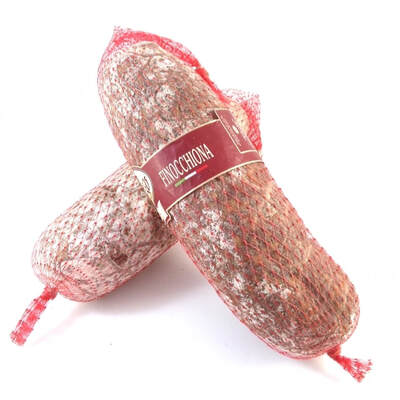
Commercial Finocchiona, photo from romeoformaggi.it
|
*We make our own informed choice on the use of additional nitrates and curing salts. If you choose to use these - swap the 3% in salt to 2.5% salt and 0.25% Instacure #2 / Prague Powder #2. You can read more in our article here : To use or not to use Nitrates (Pink Salts, Instacures)?
METHOD
1. Soak your hog casings as per instructions. Soak in fresh cold water and refresh a few times over 2 hours, running some water through the casings as well. Prior to using I add a teaspoon of wine vinegar to the bowl but this is not essential.
2. Grind the pork using a 6-8mm plate. It is worth putting your equipment and pork in the freezer for 10-20 mins so it stays firm through the process, or else the grinder action can warm the meat and turn the fat/meat mix sludgy (where the meat and fat is almost indistinguishable).
3. Place the ground/cut pork in a bowl and add the salt and start to mix through thoroughly with your clean hands (or use the paddle attachment on the mixer). It is important to mix the salt through thoroughly so the meat binds in the final casing leaving no air pockets.
4. Add the fennel, white pepper and minced garlic and start to mix through a bit before adding the wine. Now mix through and churn with your hands for a couple of minutes. It is important to get a good meat bind so it sticks together in the casing. The salt and the acidity and the wine make the meat inhospitable for bad bacteria to grow. If you are using a starter culture then add this and mix through as well.
5. Put into your hog casings with either a sausage stuffer or the plastic bottle funnel method (see TIPS). Make sure the skins are packed with the mix so there are no air pockets. I aim for 25cm-30cm lengths on a 30-34mm.
TYING TIP - tie one granny knot around the casing skin to close it, then loop the flap of casing over the knot, and tie another knot, then with the two ends tie into a loop for hanging.
6. Prick the casings all over with a sterilised pin or needle to remove any possible air pockets
7. Now weigh each length, make a note of the weight on some tape or a tag, and attached to the sausage. I find it useful to also record the date and the target weight. Calculate a 30% weight reduction (multiply the weight by 0.7 on a calculator) and write this down on the tag as target weight (T). This is the minimum weight loss you should work with, after this the texture will get firmer over time and it will be down to your own personal preference on the texture. I like to leave this to the 33-35% mark with these smaller casings and typically hits its target weight around the 3 week mark.
8. Now hang in relatively warm area for 24 hours. Anything around room temperature is ideal 16-20C, out of direct sunlight, before moving to a cooler area 9-12C. Again, out of direct sunlight and with some minimal airflow (so don't put it in a cellar with stagnant stale air) I hang mine near the back door in the winter and into a wine fridge during other seasons, then opening the door every day to check my meats, like a doctor checking his patients in the hospital ward.
9. Now it just a case of waiting. Inspect every day. If you see any bad mould (green) then you will have caught it early and can wash off with some wine vinegar – not all green mould is bad believe it or not. White mould is good, but not essential for this finocchiona. Any white mould will improve the flavour profile further and also inhibit the growth of bad bacteria on the surface. If you see any black mould then you likely have something nearby causing it and I would bin the sausage to err of the side of caution. Sorry, it can happen depending upon your set up ; in 12 years I have had it once and isolated it to a pool of water I had missed pooling at the back of my fridge around the exit pipe – I ended up bleaching my curing chambers and now check daily – and never had it again.
Your finocchiona lengths will lose weight very quickly at first before the weight loss slows down and start to have sweet pleasant porky smell. If at any point your sausage smells rancid or deeply acidic or is slimy then you should bin that as it means the bad bacteria has grown inside, probably within an air pocket. This is why you should pack your sausages tight, mix your meat and spices thoroughly and prick any air holes with a needle or pin.
As your finocchiona cure they will start to harden. Once you get to the 2-3 week marker you can relax a bit, and once they hit the target weight you can continue to hang and cure them or move them to the fridge ready for eating or pack them. These will last a good while like any cured salami, though to be honest once your friends find out you have made these they will devoured along with a glass or two basking is the sunshine.**
** Sunshine is not guaranteed nor necessary to enjoy this charcuterie. ;)