HOW TO MAKE GUANCIALE
|
GUANCIALE (pronounced “ger-wan-shar-lay”) is fabulous cut of cured meat used in Italian cooking that is flavoursome, follows the mantra of not wasting anything from the pig, and an ideal cut for the beginner to try their hand at some homemade charcuterie. There is no point being squeamish about part of the pig this is from – it’s the jowl from the side of the pig’s face – but remember that with all meats its typically the hardest working muscles that carry the most flavour; when combined with the fact that the face fat here is harder and different to the rest of the pig it can completely replace the need for any cooking oils and can take on a number of infused flavours.
Combine this with the fact that the jowl is a super cheap cut from the butcher it works out around 10x cheaper than any shop bough equivalent if you do it yourself. Depending upon your location you may have to ask the butcher to order in for the next day as certainly here in the UK it is not a commonly used part of the pig at all. When selecting try and get the fattiest jowl you can! The fattier the better. |
|
Used typically across central and southern regions of Italy it is probably most famous for being the integral ingredient in the trinity of classic dishes like Amatriciana, Carbonara, and Gricia. In fact “pancetta” is not traditionally used in these dishes at all. In fact I’ve found myself coming back to using this more recently after I discovered more great recipes, beyond just the above, over at the fantastic My Pinch Of Italy where Fiorenza showcases hundreds of traditional Italian recipes from her Italian kitchen. A real variety of recipes are worth exploring there, beyond the Italian "classics", which is why I love it so much. Her recipe for guanciale, black garlic and cherry tomatoes is mouth watering and moorish! (check out the recipe here : Guanciale with Black Garlic and Tomato)
This was one of the first cuts I learnt many years ago, and its ideal for a beginner as it is almost fool proof; this is a very forgiving piece of meat – there is only one important thing to remember and that is the % of salt.
This was one of the first cuts I learnt many years ago, and its ideal for a beginner as it is almost fool proof; this is a very forgiving piece of meat – there is only one important thing to remember and that is the % of salt.
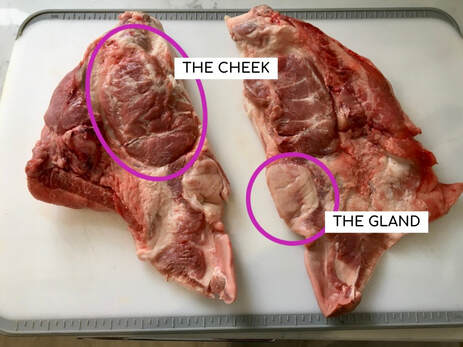
Showing the cheeks and glands
|
In the UK we only really value the eye of the jowl (the oval meat of the pig cheek) but here we are using the whole jowl, skin included. When you get it from the butcher it may or may not have the glands attached – these you want to cut out. They are easily identifiable and easily removable - they are light grey ovals that are soft to the touch (like a partially filled water balloon) positioned next to the red cheek meat. During this curing we are going to leave the skin on.
When using salt in this recipe I recommend a sea salt, rock salt, coarse salt, flaky salt, kosher salt or PDV salt, - when making charcuterie I always recommend avoiding Iodized salts (cooking salt or table salt) as these have anti-caking agents in (with horrific names) and added potassium which can add some metallic taste. |
|
INGREDIENTS
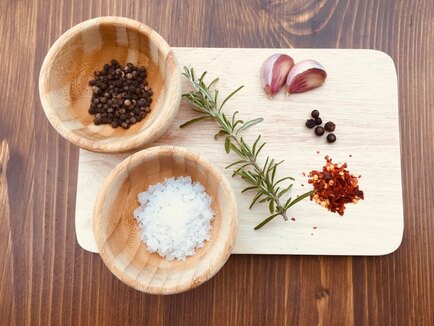
Whole Pig Jowl 3% of the weight of the jowl in Salt (see above) 1.5% Cracked Pepper Ground black pepper (for the second stage) A ziplock bag or large sealable food grade bag And then additional flavourings are entirely down to you. I love using some crushed garlic, fresh rosemary, and some chili flakes – but you can add anything you like here – bay leaf, juniper berries, thyme, oregano, fennel seeds, coriander seeds – it’s like having a blank canvas and you are the artist! I recommend: 2 garlic cloves crushed whole under the flat of a knife A spring of rosemary A teaspoon of chilli flakes |
Ingredients
|
|
METHOD
1.Leave the skin on, and prepare the jowl by removing the gland (if present) and any hair on the skin side (burn or shave off), then gently wash and pat dry with clean tea towel. 2.Grab a large dish, place the jowl in (meat side up) and sprinkle over all the salt, cracked pepper, and optional flavourings (in this case the garlic, rosemary leaves, and chili flakes) and rub/massage the dry mix all over the meat side – give it all a good rub in – then with what hasn’t stuck to it, rub over the skin side. Enjoy those glorious aromas of your spice mix! 3.Place the jowl in the bag, along with ALL the remaining cure that is in the dish. Then seal the bag, getting rid of as much air as possible. A good tip here is to submerge the bag in water, and through the magic of something called the Archimedes Principle, the bag will constrict around the bag pushing the air out. Then seal and dry the bag. |
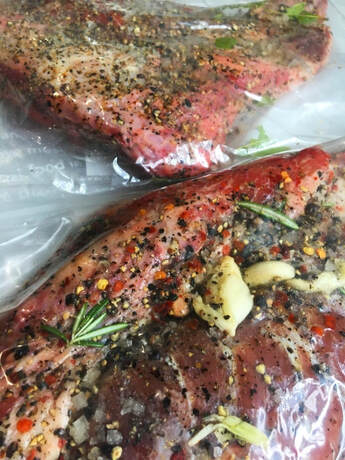
Dry cure and jowl in bag - ready for the fridge
|
4.Now massage the meat again through the bag for a minute or so.
5.Now pop it in the fridge, skin side up. It’s going to stay here for 5-7 days (5 days minimum, go to 7 for larger pieces > 1kg or so). If you are able to add some weight or other fridge goods on top then do so – this will all aid with pressing the water out from the meat – but is not essential. Most important is to take it out each day, give it another massage to redistribute the dry cure, and TURN IT OVER. It’s not the end of the world if you forget a day as long as the meat side has been down at least 3 days.
5.Now pop it in the fridge, skin side up. It’s going to stay here for 5-7 days (5 days minimum, go to 7 for larger pieces > 1kg or so). If you are able to add some weight or other fridge goods on top then do so – this will all aid with pressing the water out from the meat – but is not essential. Most important is to take it out each day, give it another massage to redistribute the dry cure, and TURN IT OVER. It’s not the end of the world if you forget a day as long as the meat side has been down at least 3 days.
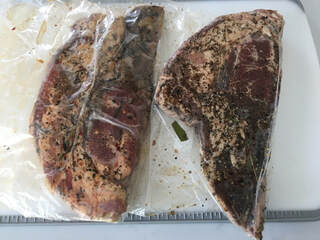 After 5 days, the meat will be darker
6.Over the days you will liquid starting to form - don’t be tempted to open and pour this away – this is the salt extracting the water from the meat through osmosis (you may remember this from school!) This is now becoming a natural brine and will be imparting the flavours from your blend. You may notice that the meat is darkening - this is entirely normal and part of the process.
7.After the 5-7 days, take out the fridge and wash the brine and any loose cure off. No need to scrub anything here, just wash off what comes off naturally under some running water – some parts of the cure will stay stuck to the jowl. It’s fine to leave this. Now pat dry with a clean tea towel, remembering to check any crevices at the side.
8.Now sprinkle ground black pepper all over meat and pat in with your hands. The pepper will stick to the meat and fat as this will be a bit tacky now. This will now be serving to protect your meat from insects as well as adding to the flavour profile.
9.Your jowl will have one end that is thinner and more flappy – here you want to pierce it and pass some kitchen string or twine through to create a hoop, so the meat can be hung.
|
10.Now hang this somewhere in a room that is relatively cool and out of any direct sunlight. No need to be fastidious about this – anywhere 10-18C is fine.
11.You are going to leave this now for at least 5 weeks. There will some weight loss from the red meat portion but not from the fat. Much of the jowl is fat, and fat is an adipose tissue which means there is minimal water content, so it impossible to work to any % weight loss calculation that you may see with other cuts in charcuterie. 12.After the 5 weeks it is ready for use, you can leave it longer fi you wish and the flavours will mature further. To use, just cut off the amount you need – the recipe may or may not call for you to remove the skin. This can then then be stored in the fridge or rehung – although to be fair when I have made a batch of 3-4 jowls they get devoured pretty quickly or part of a trade with a begging friend who wants some at home. |
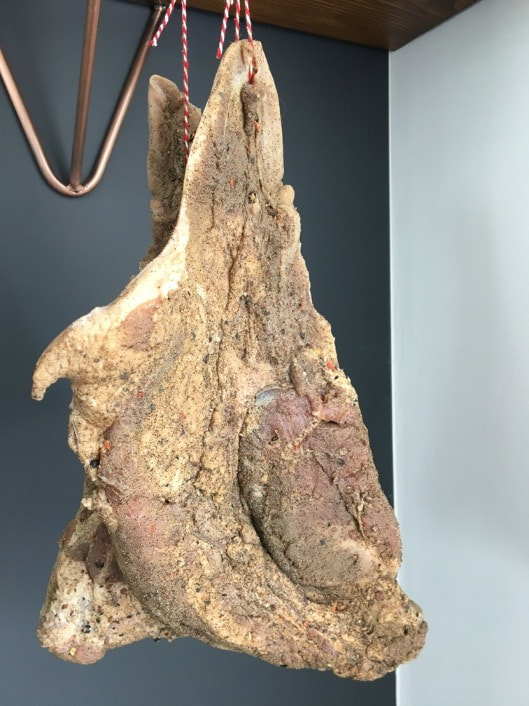
Guanciale hanging and drying
|